

Guest Blogger: I asked my smoking, grilling, meat cooking man to contribute this to DiggingFood.com. The dishes I blog about are not usually meat focused. But, this was too delicious to not share.
For all of my vegetarian readers, scroll quickly past this. I promise my next post will be green.

Making home cured bacon is quicker, easier and tastier than I first thought it would be. We had an opportunity to buy half of a pig raised by a friend of ours. It provided us with many traditional cuts that we knew well enough how to prepare. But in addition to that we ended up with some cuts that were not as common. One thing for which I was most excited was a large slab of belly. I had assumed that making bacon at home would be quite an undertaking. But when I finally get around to doing it I wondered why you haven’t been doing it my whole life. You can experiment and customize flavors (sriracha, coffee, maple) but even simple traditional style will have you savoring every last bit of delicious fatty belly.
You can acquire belly as we did, with a lot of other meat. Or you can try asking your supermarket butcher if they have it. One great source that often goes overlooked is a Mexican Tienda/Carneceria. Once you have your belly, you are ready to step into the world of home cured bacon.
NitrAtes & NitrItes:
Nitrites are a critical component to Bacon. They not only kill bacteria but they provide the characteristic cured taste and red color. In long cures, like when making salami or dried sausages, nitrates are superior as they subsequently break down to nitrites over extended periods of time. Bacon, however, is a short cure so the use of nitrite is the preferred method. Because of the relatively high toxicity of pure nitrite (the lethal dose in humans is about 22 mg/kg of body weight), the maximum legally allowed nitrite concentration in meat products is 200 ppm. You typically want to use 120 ppm nitrite in your bacon. About 10% less if the skin is on the belly as it does not absorb the nitrite.
120ppm = 0.120g of nitrite per KG of meat
Cures:
In the olden days, saltpeter (potassium nitrate) was the source of nitrites in curing. However, due to its high nitrate concentration and grainy white consistency, many deaths occurred due to people mistaking it for table salt (NaCl). It is not much widely used in cooking anymore and you probably can’t find it anywhere outside of you grandmas pantry. Most cures that are sold nowadays contain a modest amount of nitrate and/or nitrite (3%-7%), salt, and red food coloring. This is the so called “pink salt” used in curing. DO NOT confuse this with the popular Himalayan/Hawaiian Pink Salt that is so popular now. The Himalayan/Hawaiian variety does not contain nitrites/nitrates. A typical (US) pink curing salt has 6.25% nitrite and 93.75% NaCl. It goes by a variety of names: Prague Powder #1, Insta-cure #1, Tinted Cure Mix (TCM), DQ cure… The stuff that I get locally is called Legg Cure and is available in small packets at Southeastern Butcher Supply in downtown Helena, AL. You can also order the stuff online from various vendors.
The Cure Mix:
The method that I use is called an equilibrium cure. It relies on precise ratios of nitrite, salt and sugar and then just lets it hang out with the belly for a week so that the entire mixture has a chance to come to equilibrium. I bought a digital kitchen scale for preparing the cure. You can find decent ones for $20-$30 and they are invaluable. Also it will up your baking game as weighed ingredients make more consistent breads. You can make the cure in bulk or per project. Here is a typical bulk recipe:
- 19g of 6.25% pink salt (Legg cure)
- Add fine-grained kosher salt to a total of 250g.
- mix very well
This is the minimum required amount of nitrite to do 10 kg of pork and will be at a moderate 2.5% salt level. Use exactly as much cure mix as you need: no more, no less. If you have 4.53kg of pork, use 4.53kg x 0.025 = 113g of this mix.
Of course you can adjust the numbers to batch size but be as precise as possible.
1.9g of Legg cure/1000g belly + 23.1g salt/1000g belly
Use fine-grained kosher salt so that it mixes well together. If you use very coarse kosher salt, the pink salt will “fall through” the kosher salt and tend to sink to the bottom. Always mix the salts thorough each time you use part of the batch to ensure that the salts are evenly distributed.
Based upon your results with this cure recipe you can adjust things a bit for your taste on the next batch. Never go more than 200 ppm nitrite (about 32g in this bulk recipe). This amount is usually only recommended for making ground sausages as they can pose a risk of botulism. You can adjust the NaCl between 2%-3% of meat weight, or add up to 10% of the meat weight (100g sugar/1000g belly) in brown or white sugar. But you still always want to keep your nitrite at a minimum of 120 ppm of meat.

Cure Method:
I usually break my bellies into about 1000g chunks (a typical belly half slab is 3-7 kg). This allows me to fit them in a suck and seal bag for curing, fit them on my meat slicer and also gives me chance to try out different flavors. There can be some gelatinous fat on bellies that don’t come from the supermarket. I trim that off of as it doesn’t contribute.
In this method, we are going to do a dry cure with no added liquid. You want to place your belly chunk in a plastic bag. I use a suck-n-seal bag but have also done it with gallon zip-locks. Then add the appropriate amount of curing salt. Add 25g of the cure mix from above per kilogram + any sugar or spices that you may wish to include. Popular additions are thyme, peppercorns and bay leaves. A good starting point (all measurements per 1 kg belly):
1.9g of Legg cure (6.25% sodium nitrite)
23.1g salt
50 g brown sugar
2 bay leaves
10 peppercorns
Teaspoon of dried thyme
As an aside, I’ve not done a lot of scientific experimenting with flavors but what I have heard is that after 10% sugar/meat the bacon becomes flavor saturated; adding liquid sugars (molasses, honey, maple syrup, sorghum) makes the final product “sticky;” and although the meat gets cured through after 3 days, leaving it a week gets more flavor in there and 10 days is the flavor saturation point for this.
After combining the belly, cure, sugar and spice together seal the bag tightly. Don’t worry about getting the air out, you want a little air space. Now massage the cure around and into the meat making sure it’s all covered. Place the meat into a fridge or cooler with ice. Typically I let it cure for a week flipping and massaging it once every day. After the first day, the cure should have pulled off a good amount of water that you can slosh around. It will firm up over time. You can let it sit up 2 weeks with diminishing returns after day 10. Again, I typically go 7 days.

The Smoke:
Technically it’s not necessary. I’ve made pancetta that I just sliced and fried. But we ain’t making pancetta now, are we? After you pull the belly out of the cure, wash it off well and pat it dry with paper towels. At this point you want to hang the bacon in a room with plenty of air flow for an hour or 2 to let it develop a pellicle. A pellicle is a tacky layer of proteins that come to the surface of the meat. It provides a barrier keeping moisture in during the smoke and also helps capture smoky flavor and rich color. You can just set the belly on a rack as well, but air flow is the key.
After an hour or two, feel the surface of the belly, it should be a bit tacky. It’s now ready for the smoker. It’s at this point you can coat in ground pepper if you are into that sort of thing. I typically do a cool smoke on my “Little Brown Egg.” It’s an 18” diameter terracotta planter pot that I have modified with a hot plate, chip tray, and a grill & lid from an old 18” Webber kettle that I had. It cooks at 155°-175° F and allows me to get a good smoke on meats for hours without getting the temp too high. I’ll do my bacon for up to 4 hours over fruit wood or pecan and then finish in the oven if I have too.
There aren’t too many fast rules here as the bacon is going to be cooked (again) before serving. I’ll smoke to an internal temp of 155°. You can also do a more aggressive hot smoke at 250° to an internal temp 155° and eat a bunch right when they pull it off. This will have a less smoky flavor and be moister than the slower method. The choice is up to you.
After the smoke let it cool a bit and then chill overnight before slicing. It helps to put the bacon in the freezer for about 20 minutes or so before slicing. This firms it up and makes for more uniform cuts. You can freeze this sliced bacon for later in a suck ‘n’ seal bag. Or pull out the skillet and fry it all up now!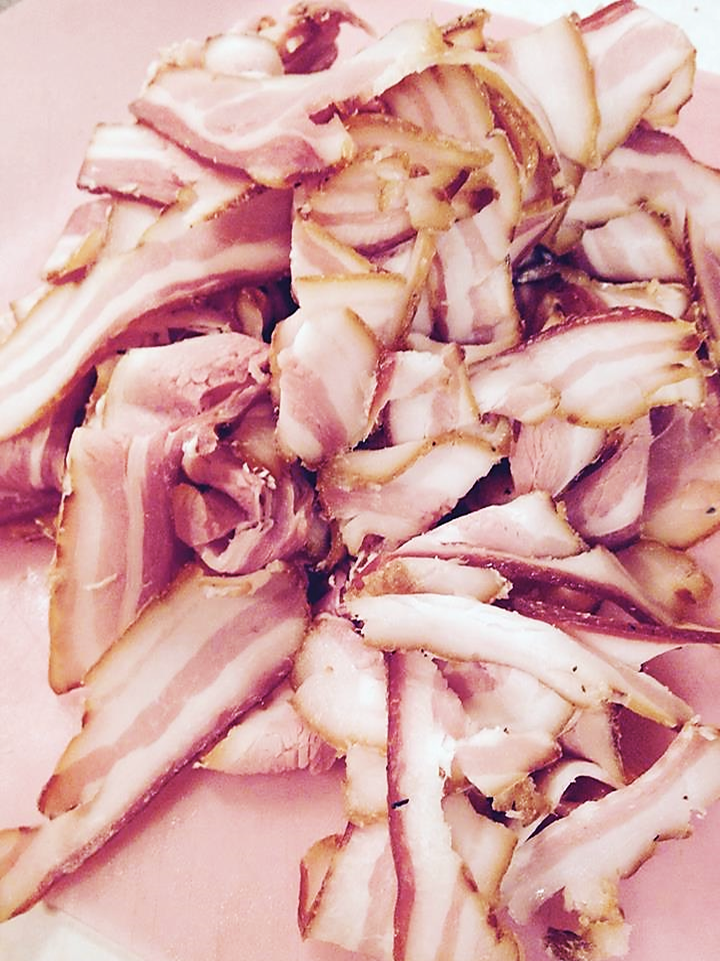


Super interesting process. Did you get ham hocks with your cuts? I’m seeing a lot of recipes using ham hocks with beans or collards. I had to look up what they are! Any advice on preparing and/or storing … or potentially a future blog post?
LikeLiked by 1 person
We’ve never actually gotten fresh hocks with the half pig (although we always ask for them). So I’ve never smoked them.
We do get a lot of “pork neck bones” that I will smoke up (but not cure) to use with our collards and field peas/beans.
The important part about about these ingredients is the ample amount of connective tissue (collagen) in them that gets rendered out into the pot liquor over the hours of cooking. In addition to adding smokey flavor it makes it thicker and richer than just adding bacon.
LikeLiked by 1 person
Ham hocks are great in greens and beans. Neck bones are even better. Maybe “Smokey Bones” could be a future post?
LikeLiked by 1 person
Thanks for this post. I’ll be keeping it for future reference. Cheers.
LikeLiked by 2 people